Continuous Deployment for Jekyll using Bitbucket Pipeline to deploy in Github

Introduction.
If you are like me you have a static web site/blog create using Jekyll and hosted in Github. The deployment is done by pushing the code to the Github repository.
In this post I’m going to write about how to use Bitbucket and Bitbucket Pipeline for continuous integration and continuous deployment.
This will be particularly use full if multiple person are working in a single site.
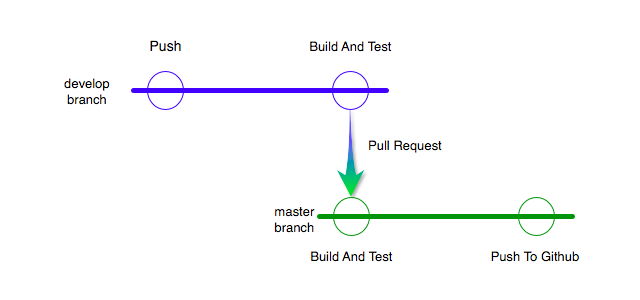
Flow Diagram
Prerequisites
- Since this about Jekyll you have to have jekyll installed, check the installation document.
- Your site should be hosted on Github, check this document .
- HTML Proofer - Test your rendered HTML files to make sure they’re accurate.
- Bitbucket Account.
Steps
Git Branches
As mentioned in the flow diagram we are going to use two branches.
- master - This will be our main branch which will be deployed in the Github
- develop - This is development branch
The changes to the master to be done using only pull request. In bitbucket if you have a premium account you can protect the master branch from direct push, if you don’t have premium access you have refrain yourself from pushing directly to master branch.
Also in Github we will only have the master branch all other branch will be in the bitbucket, this is to avoid confusion.
Create a Bitbucket repository
First Create a repository in bitbucket.org
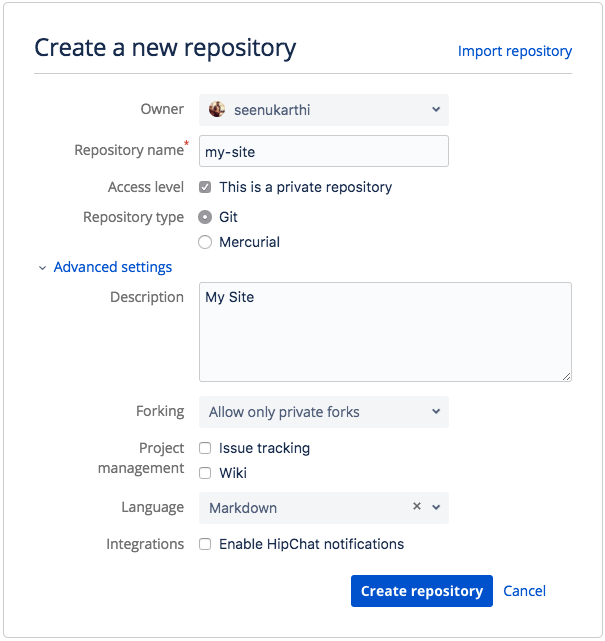
If you already have a Jekyll site published in Github clone it. and if you dont have a branch named “develop” create it from “master” and push it to the newly created repo in Bitbucket.
Initiating Bitbucket Pipeline.
Once you have the code in Bitbucket now enable the pipeline in the bitbucket.
In the navigation panel of the project click on pipeline and in the “Choose a template” dropdown select “Ruby” and click Next
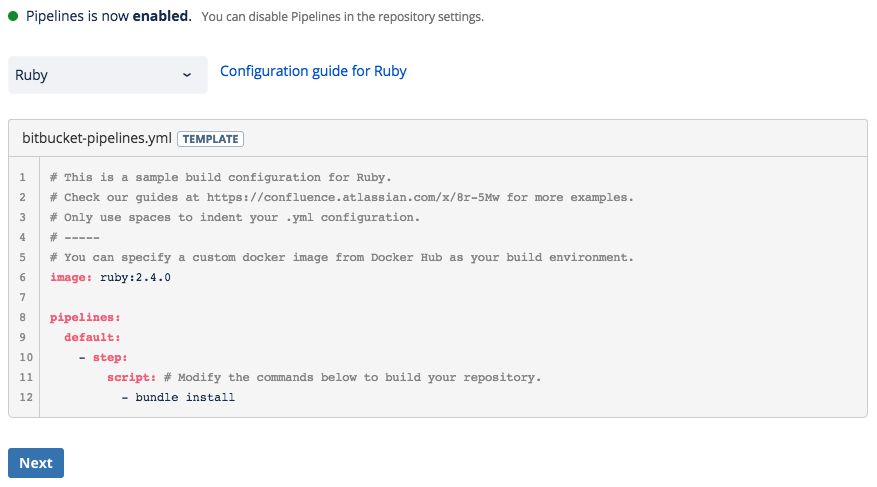
Now you will be presented with an editor for bitbucket-pipelines.yml.
Replace the content with the following
# This is a sample build configuration for Ruby.
# Check our guides at https://confluence.atlassian.com/x/VYk8Lw for more examples.
# Only use spaces to indent your .yml configuration.
# -----
# You can specify a custom docker image from Docker Hub as your build environment.
image: ruby:latest

pipelines:
  default:
    - step:
        script: # Modify the commands below to build your repository.
          - bundler --version
          - bundle install
          - bundle exec jekyll build
          - bundle exec htmlproofer ./_site --url-ignore "/#.*/"
  branches:
    master:
      - step:
          script:
            - bundler --version
            - bundle install
            - bundle exec jekyll build
            - bundle exec htmlproofer ./_site --url-ignore "/#.*/"
In the above example we have two pipelines one for default (all branches and tags) another one for master branch. Now both are same later we will add the deployment to Github.
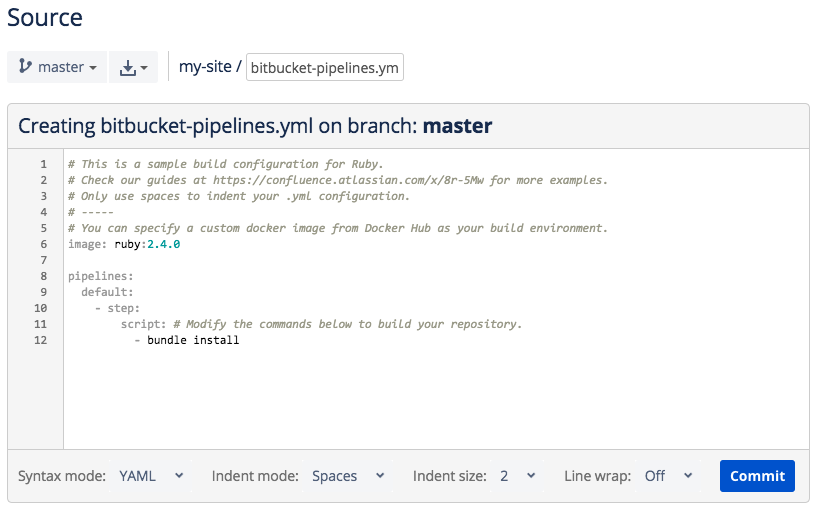
Commit the pipeline yml file, this wil create the bitbucket-pipelines.yml file in the selected branch default is “master”.
Immediately a build will be triggered but the build will fail because of htmlproofer command. For that we have to do the next step.
Gemfile
If you already don’t have a Gemfile create it. and have the following content
source "https://rubygems.org"

# The following it to use UTF-8 as encoding
Encoding.default_external = Encoding::UTF_8
Encoding.default_internal = Encoding::UTF_8

gem "jekyll"
gem "html-proofer" # For testing the static pages
gem "jekyll-paginate" # For Pagination in jekyll
gem "jekyll-gist" # Fot gist integration with jekyll
Deploying to Github.
If there is a change in the master (through pull request) after successful test using htmlproffer the code should be pushed using git.
To push to the github we have to authenticate first, for authentication we will use Github Access Token. Go to Personal access tokens for creating access token, and select “repo” scope and create a token. Copy the token and keep it in a text file for now since you cannot access the token once navigated to another page.
To store the ‘access token’ we will use “Environment Variables” in Bitbucket Pipeline
Go to Repo settings » PIPELINES » Environment variables
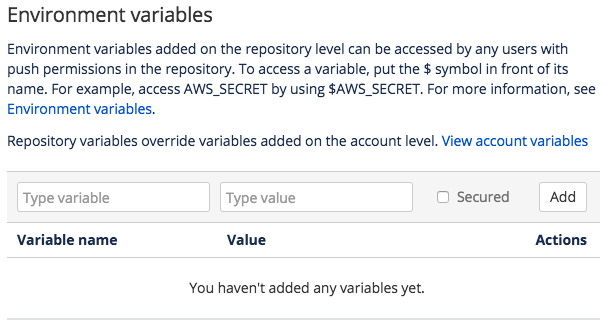
and create the following variables.
| Variable Name | Value | Secured |
|---|---|---|
| githubtoken | Github Access Token | Yes |
If your github repo’s HTTPS clone url is https://github.com/cartman/why-i-hate-kyle.git add the following in the bitbucket-pipelines.yml file in the master branch section
git push https://[email protected]/cartman/why-i-hate-kyle.git master
So your final pipeline yml file should look like the following.
# This is a sample build configuration for Ruby.
# Check our guides at https://confluence.atlassian.com/x/VYk8Lw for more examples.
# Only use spaces to indent your .yml configuration.
# -----
# You can specify a custom docker image from Docker Hub as your build environment.
image: ruby:latest

pipelines:
  default:
    - step:
        script: # Modify the commands below to build your repository.
          - bundler --version
          - bundle install
          - bundle exec jekyll build
          - bundle exec htmlproofer ./_site --url-ignore "/#.*/"
  branches:
    master:
      - step:
          script:
            - bundler --version
            - bundle install
            - bundle exec jekyll build
            - bundle exec htmlproofer ./_site --url-ignore "/#.*/"
            - git push https://[email protected]/cartman/why-i-hate-kyle.git master
Conclusion
Now when ever there is a push to the ‘develop’ branch in Bitbucket pipeline the Jekyll site will be build and be tested by ‘htmlproofer’
When there is a change in the ‘master’ branch Jekyll site will be build and be tested by ‘htmlproofer’ after successful build and test the master branch wll be pushed to Github.
Gotcha
If there is a change in the Github’s master then it has to be pull to the Bitbucket’s master else the master pipeline will fail because Bitbucket’s master is not in sync with Github’s master.

- Anaconda Proxy Repository in Nexus OSS 3
- Node Command Line Interface Tool in TypeScript.
- Continuous Deployment for Jekyll using Bitbucket Pipeline to deploy in Github
- Grunt Watch and Livereload (Using BrowserSync) in Jekyll
- Java Thick Client with Kerberos for RESTful Service
- Install Gradle in Cloud9 IDE
- Localhost Authentication for Spring Kerberos
- JasperReport with Gradle
- Jasper Reports Font Extension
- JDK Folder from Installation EXE